Showing posts with label Spinach. Show all posts

Sunday, June 13, 2010

Rollin’ Through the Weekend

Rain, rain, go away..come again some other day.

Honestly, for the past week the days have been dragging on with gloomy gray skies and a constant stream of rain that seems never-ending! I really hope Mother Nature will decide to be nice to Minnesota for once during the summer—fingers crossed!

I am enjoying my last week of summer vacation (I officially start work this coming Thursday), and I decided to come home to visit my parents for the weekend since I probably won’t make it up north again due to my future schedule. We had some grad parties to attend and I was asked to make a pasta salad for one of them. I am not a fan of boxed mixes, but in cases when you’re making big amounts, it just makes things easier.

I started with a the Classic Suddenly Pasta Salad mix.

Added in some pepperoni, spinach, and cherry tomatoes.


And it turned out like this—tasty!

lkjk

The night we got home, we went to the local Pizza Ranch restaurant. I like it because during the day, you order off the menu, but come evening, it turns into an all-you-can-eat buffet. =)

I had a salad, some mashed potatoes, a slice of California Chicken Pizza (Chicken, Green Peppers, Tomato, Onion, Garlic Sauce), and a few slices of the Prairie pizza (Mushrooms, Onions, Black & Green Olives, Green Peppers). And I had to have a piece of their Ranch Cheesy Bread as well!

And of course, being home, I had to make one of my family’s favorite desserts—an Angel Food Cake Roll. Since strawberries are in season, I decided that sealed the deal—a Strawberry Cream Roll.

jkljkl

Strawberry Cream Roll

Serves 10

Ingredients:

  • 1 package (16 ounces) angel food cake mix
  • 5 teaspoons confectioners' sugar
  • 1 cup (8 ounces) strawberry yogurt
  • 1 package (1 ounce) instant sugar-free vanilla pudding mix
  • 3 drops red food coloring, optional
  • 2 cups reduced-fat whipped topping
  • 1 c sliced strawberries

    Directions:

  • Line a 15-in. x 10-in. x 1-in. baking pan with waxed paper. Prepare cake according to package directions.
  • Pour batter into prepared pan. Bake at 350° for 15-20 minutes or until cake springs back when lightly touched. Cool for 5 minutes.
  • Turn cake onto a kitchen towel dusted with confectioners' sugar. Gently peel off waxed paper. Roll up jelly-roll style in the towel, starting with a short side. Cool on a wire rack.
  • In a large bowl, whisk the yogurt, pudding mix and food coloring if desired. Fold in whipped topping.
  • Thinly slice strawberries.
  • Unroll cake; spread filling evenly over cake to within 1/2 in. of edges. Sprinkle strawberries evenly. Roll up. Cover and refrigerate. Remove from refrigerator 30 minutes before slicing. Garnish with sliced strawberries.

    jkhjkhj

    Have you ever made a cake roll??

  • Thursday, March 11, 2010

    Boston Bound

    Sunday afternoon I arrived into Boston and was greeted with 60 degrees and sunshine beaming through the clear blue skies. A great start to a vacation! I love flying into the Boston airport—right over the ocean!

    CIMG1959

    I was ready to get off the over-packed plane and stretch my legs—where better to do it than Harvard Square!? It’s been a tradition to go there every time I come out east—so much energy, people, and sights to see.

    CIMG1967

    CIMG1971

    We had planned on eating at the renown Bartley’s Burgers, but being Sunday it was closed unfortunately.

     CIMG1965

    CIMG1964

    My aunt & I

    So instead of eating there, we walked around and stumbled on a little cafe. I ended up getting a bowl of unpictured blueberry chicken soup which sounded different, but was surprisingly delicious!!

    Then of course I had to venture inside the gourmet cooking shop! So many things to browse through.

    CIMG1968

    But backing up to Saturday—I made up a new strata recipe to clean out the fridge. I wrapped it all up in tinfoil to take for snacking on the plane. Then Saturday night, I went out to eat at the Green Mill and got my favorite, the Chicken Parmesan. They upped the serving to 3 chicken breasts now instead of 2, which is way too much to eat at one sitting, especially when you have a big baked potato too. So instead of getting rid of it, I decided to wrap that up to and made this for Monday’s lunch…

    CIMG1972

    A chicken parmesan sandwich with mushrooms, and some roasted kabocha squash. 

    I also tried a newer flavor of yogurt in the Dannon Light N’ Fit line, the Banana! It was actually really good—no artificial banana taste.

    CIMG1973

    It was even better topped with some  Tropical Dried Fruit pieces on top…

    CIMG1974 

    Here's the new strata recipe!

    CIMG1949

    Start Your Day Strata

    ‘Serves 4

    Ingredients:

    • 1/2 c yellow onion, sliced
    • 1/2 c yellow bell pepper, sliced
    • 1/2 c mushrooms
    • 1/2 c spinach
    • 1/2 c cottage cheese
    • 1/2 c eggbeaters
    • 1/2 c milk (I used 8th Continent soymilk)
    • 1/4 c chunky salsa
    • 2 light whole wheat buns (I use Village Hearth)
    • 5 thin slices of deli ham
    • 1 Yukon gold potato—sliced very thin
    • 1/2 tsp Italian seasoning
    • 1/2 tsp fennel seeds

    Directions:

    • Preheat oven to 400 F. Spray an 8 x 8 baking dish with cooking spray.
    • Take whole wheat buns and split in half. Tear up into cubes and press evenly into the bottom of the dish.
    • Mix cottage cheese, milk, egg beaters, and salsa until combined.
    • Meanwhile, sauté onions, mushrooms and bell peppers on medium until fork tender—5 minutes. Pour on top of bun cubes and spread evenly.
    • Next, pour egg mixture over the vegetables and let sit for 15 minutes. Layer spinach over the top.
    • Cover the egg mixture evenly with the slices of ham and top with the thin slices of potato. Sprinkle seasoning and fennel seeds evenly over the top.
    • Bake for 20-25 minutes or until potatoes are fork tender. Cool and cut into 4 large slices.

    CIMG1950

    We finished the day with dinner at Pub 99. I was craving some good New England seafood, so luckily they had just what I was looking for.

    Captain's Combo Platter - A hearty sampling of all your fried favorites - shrimp, sweet scallops and haddock served with french fries and coleslaw.

    I got it broiled instead of fried, a baked potato instead of fries and butternut squash instead of coleslaw—so good!

    pub99

    **Stay tuned for the other half of my trip!**

    Sunday, February 7, 2010

    Cozy Comfort Casserole and Lazy Lasagna

    Wow—what a week! It seems as if each month I keep getting busier and busier! I have definitely been improving my time management skills. I usually just leave my daily planner stuffed somewhere and keep track of everything mentally, but I recently dusted it off and started writing stuff down which has been really helpful. How do you stay organized when life gets hectic?

    I taught my first cooking class through the Community Education programs this past Thursday. It was beyond fun to share some tropical recipes with the class! I also had a few fun little food quizzes with tropical gifts like hint of lime chips, tropical salsa, pina colada drink mix, and some tropical mixed jelly beans. The menu, some pictures, recipes, etc. will all be up by next week on a new tab I am making called “Cooking with CaSaundra”, so you’ll be able to access that right underneath my cookbook on the right hand side—so stay tuned for that!

    Anyway, like I said weeks like the past one make me really appreciate a 48 hour weekend of r&r, and although I don’t mind being in the kitchen “relaxing”, I do tend to lazy it up a bit if I’m not in the mood to whip up something extravagant, so in this case I will probably be making one of my go-to lazy/comfort one pan meals. Less fuss & less mess!

    ----------------------------

    Lazy Lasagna

    Serves: 4

    Ingredients:

  • 1 1/4  cups  marinara sauce
  • 1  20-oz. package refrigerated cheese ravioli OR 20 oz frozen ravioli which is cheaper, just be sure to thaw it out prior to using it.
  • 1  10-oz. box frozen chopped spinach, thawed and squeezed dry OR 5 oz fresh spinach (I am not fond of frozen spinach so I used fresh)
  • 8  ounces  shredded part-skim mozzarella
  • 1/4  cup  grated Parmesan
  • Feel free to add in mushrooms, onions, or anything else you’d like!
  • Directions:

    • Preheat oven to 375°F. Lightly grease an 8-inch-square baking dish. Spoon 1/4 cup marinara sauce over bottom of dish. Cover with half of ravioli. Spread half of remaining sauce over ravioli. Sprinkle on spinach and then half of mozzarella. Repeat with remaining ravioli, marinara and mozzarella. Sprinkle top with Parmesan.
    • Cover dish with foil and bake for 30 minutes. Remove foil and bake until bubbling, about 10 minutes longer. Let cool for about 5 minutes before slicing.

    Italian Bisquick Bake

    Recipe by me

    Serves: 4

    Ingredients:

    • 2 medium potatoes, thinly sliced
    • 1-8oz can tomato sauce
    • 1 small zucchini,sliced
    • 1/4 diced red onion
    • 1/2 c sliced button mushrooms
    • 1 c fresh spinach
    • 1 chicken sausage (I used these)
    • 2 eggs
    • 1/2 c milk
    • 1/2 c sharp cheddar cheese
    • 1/2 c parmesan reggiano cheese

    Directions:

    • Preheat oven to 350 F. Slice potatoes horizontally into thin pieces. Meanwhile, take a skillet with cooking spray and sauté potatoes until tender—remove, but keep heat on. Add onion and sausage and cook until tender (5-8 minutes).
    • Mix Bisquick, milk and eggs thoroughly in separate bowl.
    • Layer potatoes evenly in the bottom of the pan. Top
      with sausage and veggies. Then evenly spread can of tomato sauce followed by the cheese and topped with the Bisquick mixture.
    • Bake for 20-25 minutes, or until hot and bubbly.


    Enjoy the Super Bowl if your watching!!! :-)


    Tuesday, January 26, 2010

    Baked in a Bowl

    Can anyone agree that winter weather is becoming a tad old and it’s only January? I woke up yesterday to 35 mph winds and about 2 ft of snow drifts—no school wasn’t cancelled, so off I went like a crazy college student in a Cougar sliding through stoplights—what a great way to start the day—it sure woke me up!

    But one good thing about cold and blustery days is that it calls for warm-you-up meals! I think we all probably have some sort of meal that we grew up eating that strikes our appetite every so often. For me, it’s my mom’s homemade baked potato soup—this time I didn’t have all the ingredients on hand, so I figured it was a good opportunity to make my own twist on it. What was your favorite growing up food?

    And having soup was the perfect opportunity to showcase one of the recipes I will be teaching in my cooking class “Bisquick Bonanza”. The description of the class reads:

    No longer think of Bisquick as just an everyday baking mix. With this class, you’ll learn to add some pizzazz to this pantry staple. Appetizers, desserts, and hearty main dishes are all bounding from a box.”

    So here’s your first sneak peak at one of the recipes, and why not make this soup for an all-around great winter meal?


    Semi-Homemade Baked Potato Soup

    GetAttachment[1] (2)

    Serves: 8

    Ingredients:

    • 1-11 oz bag of Bear Creek Creamy Potato Soup mix and ingredients called for on package (pictured below)
    • 8 oz pre-cooked cubed ham
    • 1 c canned sweet peas
    • 1/2 C yellow onion, sliced
    • 2 c fresh baby spinach
    • 1/2 tsp black pepper

    Directions:

    • Start water called for on package to a boil. Meanwhile sauté onion in a sprayed pan until translucent. (5 mins)

    GetAttachment[1] (3)

    • Once water reaches a rolling boil, dump in soup mix. Stir until well combined. Pour onion, peas, and ham in.

    GetAttachment[3] (2)

    • In the last 5 minutes, add in the spinach and pepper.

    Bisquick Bread Bowls

    (I recommend using the Bisquick Heart Smart mix to up the nutritionals!)

    GetAttachment[1] (4)

    Serves: 5

    **You will need Pyrex or some other type of oven-safe bowl to make this recipe.**

    Ingredients:

    • 1 package regular active dry yeast
    • 2 tablespoons sugar
    • 3/4 cup warm water (105°F to 115°F)
    • 3 cups Bisquick Heart Smart® mix

    Directions:

    • In large bowl, dissolve yeast and sugar in warm water. Stir in Bisquick mix until dough leaves side of bowl and forms a ball. Turn dough onto surface lightly dusted with Bisquick mix; gently roll in Bisquick mix to coat. Knead about 1 minute or until smooth. Cover and let rise 10 minutes.

    • Heat oven to 375°F. Grease outsides of five 10-ounce (large) custard cups. Place cups upside down on large ungreased cookie sheet. Divide dough into 5 equal parts. Pat or roll each part into 7-inch circle. Shape circles over outsides of custard cups. (Do not curl dough under edges of cups.)

    • Bake 15 to 18 minutes or until golden brown. Tap custard cups to loosen bread bowls. Cool 3 minutes; carefully lift bread bowls off custard cups. (Custard cups and bread will be hot.) Cool bread bowls upright on wire rack.

    What’s your favorite soup?

    Friday, October 23, 2009

    Box of Bisquick

    So glad it’s Friday, like I always am!  This weekend will be busy just like weekdays though. But it is busyness I have brought on myself, and a type of busyness I don’t quite mind—I like to call it kitchen busyness! Do you know what I am talking about? Whole days in the kitchen spent mixing, experimenting, tasting, all the while trying not to sweat due to the oven and stove top on? Yes, that kind of busyness. I have a embarrassing massive amount of recipes from everywhere piling up in a box. I figured since I don’t have a lot of homework, it is a perfect time to put a dent in this box. Some things planned: Cinnamon rolls with an unsuspecting twist, a soup that my old Italian neighbor lady used to make, a new bread machine recipe, one more pizza to celebrate National Pizza Month, and 2 Halloween treats to post next week. Now whether or not I get to ALL of these is yet to be known, but keep your fingers crossed! :-) Oh and keep an eye out for some amazing product reviews soon as well.

    So today’s post has reference to Bisquick, which if you don’t know is just an all-purpose baking mix sold in a box for roughly a little over $2.00. Recently I have become a big fan of their slightly newer Heart Smart Bisquick Baking Mix, which is basically just a healthier alternative to using Original Bisquick mix. It also has more calcium, low in fat with 0 Trans Fat, and it is certified by the American Heart Association. Once I logged onto the Bisquick website, I was blown away with all the recipes that use Bisquick. So I bookmarked oh, about 20 and have gotten through about 6. But I need to get through all of them by December, because I am planning on teaching “A Box of Bisquick” as one of my cooking classes that I start teaching in January(the catalog gets printed in Dec.). I think it’s a GREAT way to keep meals cheap, healthy, fast, and I bet you could find at least one recipe on the website, so it can please many palates. Within the next couple of weeks I’d love for you to stay tuned for “A Box of Bisquick” previews and recipes!

    Bon Appétit a la Bisquick!

    My thoughts on this recipe: Great overall! Looks super fancy, and tasted like it took a long time and expensive ingredients. However, next time I will be using fresh spinach, I am not too fond of the frozen spinach taste.

    Impossibly Easy Spinach Parmesan Pie

    CIMG0799

    Ingredients:

    1 tablespoon butter or margarine
    4 medium green onions, sliced
    2 garlic cloves, finely chopped
    1 package (10 ounces) frozen chopped spinach, thawed and squeezed to drain
    1/2 cup small curd creamed cottage cheese
    1/2 cup  Bisquick® mix (preferably Heart Smart!)
    1 cup milk
    1 teaspoon lemon juice
    1/4 teaspoon pepper
    3 eggs
    3 tablespoons grated Parmesan cheese
    1/4 teaspoon ground nutmeg

    Directions:

    1.Heat oven to 350ºF. Grease 9-inch pie plate. Melt butter in 10-inch skillet over medium heat. Cook onions and garlic in butter 2 to 3 minutes or until onions are tender. Stir in spinach; spread mixture in pie plate. Spread with cottage cheese.

    2.Stir Bisquick mix, milk, lemon juice, pepper and eggs until blended. Pour into pie plate; sprinkle with Parmesan cheese and nutmeg.

    3.Bake about 35 minutes or until knife inserted in center comes out clean. Cool 5 minutes. Sprinkle with additional Parmesan cheese, if desired.

    Nutritionals and such can be found here.

    Check out one of my prior Bisquick recipes here.

    Want some free muffins? Of course you do—head here for your chance!

    Monday, August 31, 2009

    Start Your Week Off Stuffed

    Monday’s can sometimes be the worst day of the week—back to school, work—you know the feeling. But there is something that can make it a tad bit better. How you ask?? With a super stuffed recipe of course ;-) What can be so good that it would transform a whole day, even a Monday? Here’s a clue..

    If you guessed chicken, you’re right! But not just your everyday chicken—this recipe was inspired by one of my favorite restaurant meals. It’s cheaper than the restaurant ($2.28/serving vs. $9.99), and even though it took awhile to compile the ingredients to perfection, it was soo worth it. And lucky for you, it’s pretty easy as well!

    CIMG0498

    Crab Stuffed Chicken Breast

    *Serves 1, but you can easily double or triple.

    Ingredients:

    • 4 oz skinless/boneless chicken breast
    • 2 Tbsp FF block cream cheese, room temp
    • 6 tsp imitation flaked crab, 1oz
    • 1/6th an envelope of Lipton savory herb&garlic mix(about 1 1/2 tsp)
    • 2 egg whites
    • 1 tsp butter or butter spread (I used I Can't Believe It's Not Butter)
    • Handful of spinach, optional

    Directions

    • Preheat oven to 350 F and smear butter spread in a 12-inch skillet on stovetop.
    • In a small bowl, mix cream cheese, crab, and Lipton soup mix.

    CIMG0489 CIMG0487

    • Take 4 oz chicken breast and slice into it horizontally, stopping about 1-inch towards the opposite end.

    CIMG0490

    • Spread the inside of the chicken breast with the cream cheese mixture and flip the opening shut. If you’re having trouble getting everything to stay inside, you can seal with a toothpick, just remember to take it out before you eat it—ouch!

    CIMG0491

    • Roll chicken breast in egg whites until completely coated. Then dredge it in the bread crumbs—you may need to add a few more breadcrumbs if you can’t cover the whole piece.
    • Cook for approximately 10 minutes on MED-HIGH heat, flipping once. If the outside starts to get extremely charred, turn down heat.
    • Next place in baking dish, and bake, uncovered for 15 minutes, and you’re done!!
    • Serve on a bed of baby spinach if desired.

    CIMG0496

    Have a great start to your week!

    Saturday, August 29, 2009

    Just Another Stuffed Saturday

    It’s the weekend!

    I think I forgot how it feels to actually need a weekend to relax. I was so used to my summer weeks and weekends running seamlessly together, which was no big deal—now, with college deadlines, reading, and keeping up an apartment, I definitely hanker toward Friday to relax for 2 whole days! This weekend I need to do some reading, cleaning, and baking of course! An awesome recipe coming soon, so keep an eye out for that. :-) What do you like to do with your weekends? Relax, shop, cook, a little bit of everything?

    So I just realized that I have been on a stuffed food kick. I made stuffed zucchini the other day, now another stuffed recipe coming at ya today! So that’s two this week, and I figured why not go for three stuffed recipes because three’s a charm, right? So one more stuffed recipe after today—any guesses to what it might be? This recipe today came out better than I imagined! It’s meat free so perfect if you are a vegetarian, but even if you don’t have people who eat eggs, you can also sub tofu.

    CIMG0475

    Breakfast Stuffed Potato

    Ingredients:

    • 1 medium-sized potato
    • 3 broccoli florets
    • 1/8 C chopped yellow onion
    • 1/8 C chopped mushrooms
    • 1/4 C chopped baby spinach
    • 2 egg whites or 1/4 C Eggbeaters
    • 2 Tbsp shredded Cheddar cheese blend
    • 1/2 tsp garlic powder
    • 1 tsp Italian seasoning
    • Ketchup or salsa, optional

    Directions:

    • Preheat oven to 450 F.
    • Microwave your potato until soft. I used a Speedy Spud (from Wal-Mart) which is a pre-cleaned, wrapped potato that you just place in the microwave for 7 minutes—and presto! You have a perfectly cooked and cleaned spud!

    CIMG0455

    CIMG0457

    • Next, scoop out pulp leaving a generous potato shell to stuff.

    CIMG0458

    • Now start your scrambled egg mixture. Heat skillet on Med-High heat. Stir eggs, mushrooms, onion, spinach, and seasonings together.

    CIMG0461

    • Pour mixture into skillet, and stir constantly to get fluffy eggs. As soon as all visible moisture has dissipated, turn off burner, and add egg mixture to the reserved potato pulp. Add broccoli florets, and chop everything up well.

    CIMG0463

    CIMG0464

    • Now comes the fun part—stuff your spud! I did end up with more pulp mixture than I could fit in my spud, but I ate it on the side of course :-) Then top with cheese, pop in the oven, and when it’s done in approximately 15 minutes, top with whatever you desire!

    ENJOY!

    CIMG0465


    Check out the fab giveaway here!

    Tuesday, August 4, 2009

    Perfect Your Pizza

    Do you ever go to a local pizza place or buy a pizza at the store and wish you could recreate that same flavor, texture, and of course taste? Ever since I was little, I have been eating pizza from a local mom and pop shop called Dave’s Pizza. It’s nothing completely out of this world, but I think the thin crust, their special sauce, and the overall put together of the pizza is to-die-for. So, through the years I have been trying to perfect my own pizza pie making skills—finding the right base, the right sauce, and the right combo of flavors. After a few years, I am finally happy with my pizza technique! And the awesome thing about it is that it’s totally customizable and takes under 30 minutes to whip together. This is not gourmet, but it’s good nonetheless!

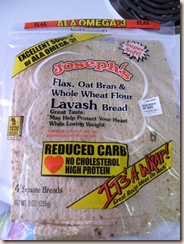
    I could make my own dough, especially with my bread machine, or I could whip together a quick whole wheat crust by hand. I could even buy premade pizza dough, but I choose to use a unlikely candidate. Lavash bread—more specifically Joseph’s Lavash bread, and I use their pitas interchangeably for this recipe also.

    CIMG0261

    CIMG0260

    Do you have these in your area?! I’m interested as to what areas don’t have them, because you are missing out on a AWESOME bread opportunity and should request them at your stores stat!

    Now usually when using pita breads or flatbreads in pizza recipes, they can turn out a soggy mess instead of the pizza crust you were going for. This happened a few times to me, and besides being a mess to eat, it wasn’t like pizza at all. So, after a few tries of different techniques to getting the perfect flatbread pizza—I found it and couldn’t wait to share!

    The key to prepping the crust is to pan fry is before adding toppings and baking. Using the dry heat method (turning your burner on high and letting the skillet completely heat), you need to place your pita or flatbread on the skillet and place a heavy spatula on top, flipping the bread about every thirty seconds until the desired crispiness is reached.

    Once you’ve completed that step, since your skillet is already hot, you can add all your pizza toppings you are going to add and sauté them until caramelized. If adding spinach, wait until the last minute or so to throw it in.

    Meanwhile, place pan-fried bread on a tinfoil lined cookie sheet and spread with the desired amount of sauce. Once toppings are finished sautéing, place those on next. If you’re adding some type of protein, this would come next followed by cheese! I then add some roasted tomatoes to add the the overall appeal. :-)

    Bake in a 350 F preheated oven for about 10 minutes, or until cheese is completely melted. Take out, cut, and savor each bite! I can never get enough of this—the crust turns out fabulous with a hint of that “brick-oven” taste so many pizza places try to achieve. Check out how I made my latest pizza creation! 

     Garden Veggie & Crab Pizza
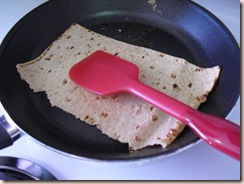
    • Started by pan-frying my Lavash bread.

    CIMG0262

    • Meanwhile, I chopped my veggies. This time I used fresh garden spinach, garden onion, and garden bell pepper(good ol’ grandpa is a fab farmer I tell ya!), mushrooms, zucchini, and canned stewed Italian tomatoes.

    CIMG0263

    CIMG0264

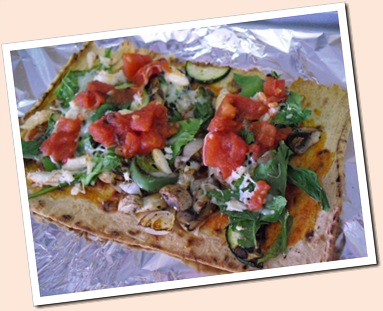
    • Next, I spread the Lavash with pizza sauce while the veggies were sauteeing. Once they were done, I layered them next, then came the canned flaked crab meat(if you’re a seafood fan this is an amazing addition!), Italian blend of cheeses, and then some Italian stewed tomatoes to give it a real tomato kick! Once I sprinkled it with some fennel seeds, in the oven it goes!

    CIMG0265

    • And then here is the finished result—this super satisfying pizza in less then 30 minutes. Plus it’s not expensive to make either! One pack of 4 Lavash’s runs about $2.08 give or take a little. I use 1/2 a Lavash per pizza :-)

    CIMG0266

    CIMG0267

    What’s your favorite method for creating a priceless pizza?!

    Let me know if you try my method—I’d love to hear what you think!